Testing and Packaging
Because free-roam VR has distinct deployment and experience requirements, testing often consumes a significant share of development time and effort. The workflow below balances test efficiency with stability.

Testing workflow: 1) single-player testing in Unity and on a standalone headset; 2) multiplayer and Playback Control integration testing; 3) full-scale on-site free-roam testing.
1. Single-Player Testing
Single-Scene Testing in the Unity Editor
-
Test Scope: Verify LBE Path transitions and visual behavior in one or more scenes.
-
Procedure:
-
Add the scenes to Build Settings, then configure the Act and Plot component order in each scene.
-
Go to YOMOV SDK > Setting > LBEPath, then click Update Act Sequence to generate the path playback order.
-
In any scene, click the YOMOV SDK Play button in the menu bar to run the application.
- Always use the SDK's Play button, not the Unity Editor Play button. Otherwise, the application cannot load the path data and will report an error.
-
End-to-End Testing in the Unity Editor
-
Test Scope: Start from the initialization scene and simulate the complete content playback flow.
-
Procedure:
-
Add the scenes to Build Settings, then configure the Act and Plot component order in each scene.
-
Go to YOMOV SDK > Setting > LBEPath, then click Update Act Sequence to generate the path playback order.
-
Open the initialization scene, then click the Unity Editor Play button to run the application.
-
End-to-End Testing on a Standalone Headset
-
Add the scenes to Build Settings, then configure the Act and Plot component order in each scene.
- Make sure the initialization scene is included in Build Settings. Playback will fail without it because initialization reads the OpenXR configuration.
-
Go to YOMOV SDK > Setting > LBEPath, then click Update Act Sequence to refresh the path playback order.
-
Go to YOMOV SDK > Builder, and select Test under Packaging Type.
-
Select the test features to enable:
-
Test tool: Enables the in-headset test tools.
Press A, A, B, B on the controller to open the test tools.
-
Performance Panel: Displays key playback metrics, including frame rate, latency, resolution, and memory usage.
-
Scene Switching: Displays the scene list and lets you switch scenes directly.
-
Accelerated Playback: Increases the Timeline playback speed.
-
-
Controller Movement: Enables controller-based player movement.
-
Watermark: Displays the watermark.
-
OpenXR Multi-Device Adaptation: Enables support for multiple device platforms through OpenXR.
-
Multiplayer Sync: Disable Multiplayer Sync in the Setting panel. The SDK automatically uses SinglePlayer, and the MultiPlayer Mode field is hidden in Builder.
-
-
Click Build to open Build Settings, select the Android platform, and build the application. When prompted, confirm that the Act Sequence is up to date and that the required YOMOVInitial component is present.
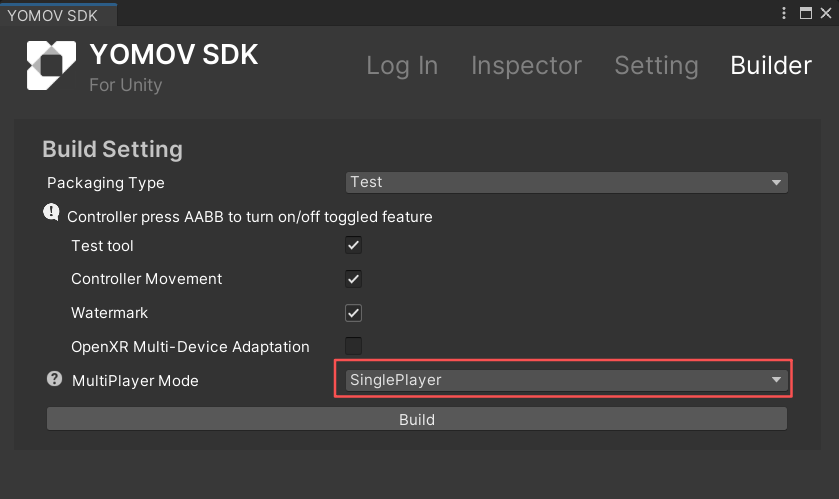
Legacy screenshot: in the current SDK, disabling Multiplayer Sync automatically uses SinglePlayer and hides MultiPlayer Mode.
2. Multiplayer and Playback Control Integration Testing
Multiplayer Synchronization Testing
Skip this workflow if the application uses its own multiplayer synchronization solution.
-
Build the Content Server
- In Build Settings, select the Dedicated Server platform and build the server application. The server build has no interactive UI.
-
Configure Client Connection Parameters
-
Enable Multiplayer Sync in the Setting panel. In YOMOV SDK > Builder > Test, MultiPlayer Mode displays MultiPlayer as a read-only value. Enter the server connection details:
-
Test Server IP: Enter the network IP address of the PC running the deployed server.
-
Test Server Port: Open config.ini in the built server folder and enter the generated port number.
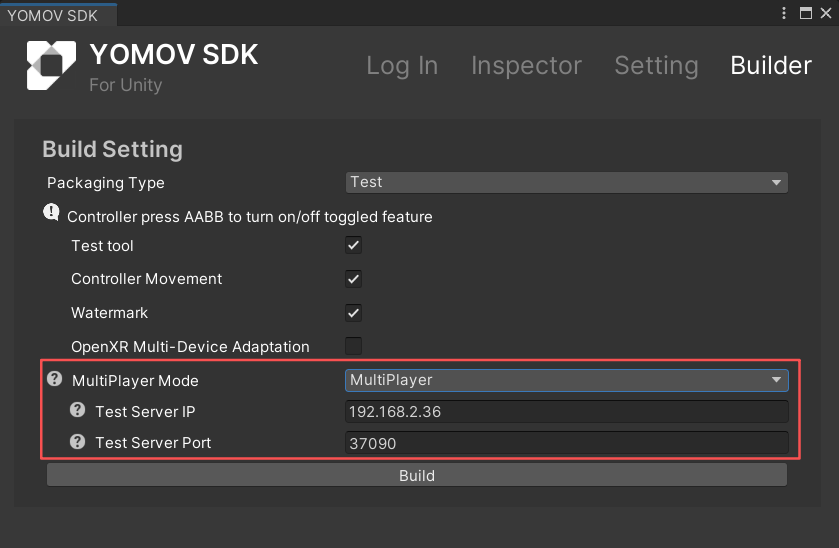
Multiplayer test build configuration
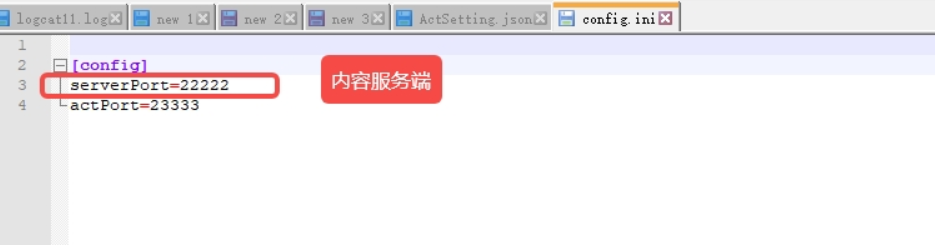
Server config.ini file
-
When the test is launched through the Playback Control Simulator, the content client reads the server IP address and port from the simulator's command-line arguments.
-
-
-
Prepare the Test Environment
-
Run one client from Unity and another client on a standalone headset.
-
Make sure the server and all client devices are connected to the same Wi-Fi network.
-
-
Start and Connect the Applications
-
Start the content server.
- Start the server first so broadcast communication is available before any clients connect.
-
Start each content client. The clients connect to the server automatically and create the player avatars.
-
Simulator Integration Testing
Use the Playback Control Simulator to test playback startup parameter parsing and connection to the Bridge Server for cross-content data synchronization.
For detailed instructions, see YOMOV Playback Control Simulator Guide.
3. Full-Scale Free-Roam Testing
Configure the Best-Experience Path
The Best-Experience Path is a predefined playable route with two purposes:
During SDK integration: Configure and load a default path to run a full-scale local simulation. Example overall dimensions include 6 x 8 or 8 x 10, depending on the available test space.
During content release: Define the intended player route from the director's perspective, including orientation continuity and rotation relationships. During automatic venue adaptation, the algorithm uses the relative positions and rotations of the path units as weighted inputs to preserve the intended experience as closely as possible.
-
Go to YOMOV SDK > Setting > LBEPath > Act Units Panel, click Create Best-Experience Path to open the path-editing scene, then click the Play button.
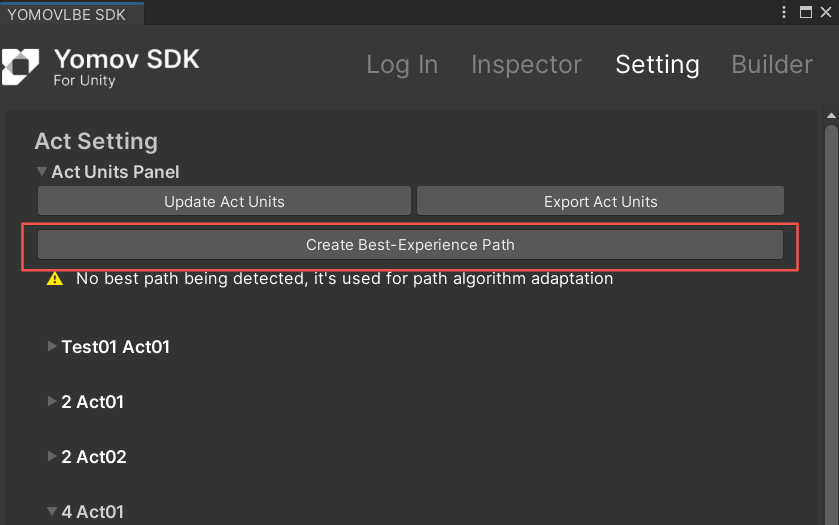
Open the Best-Experience Path editor
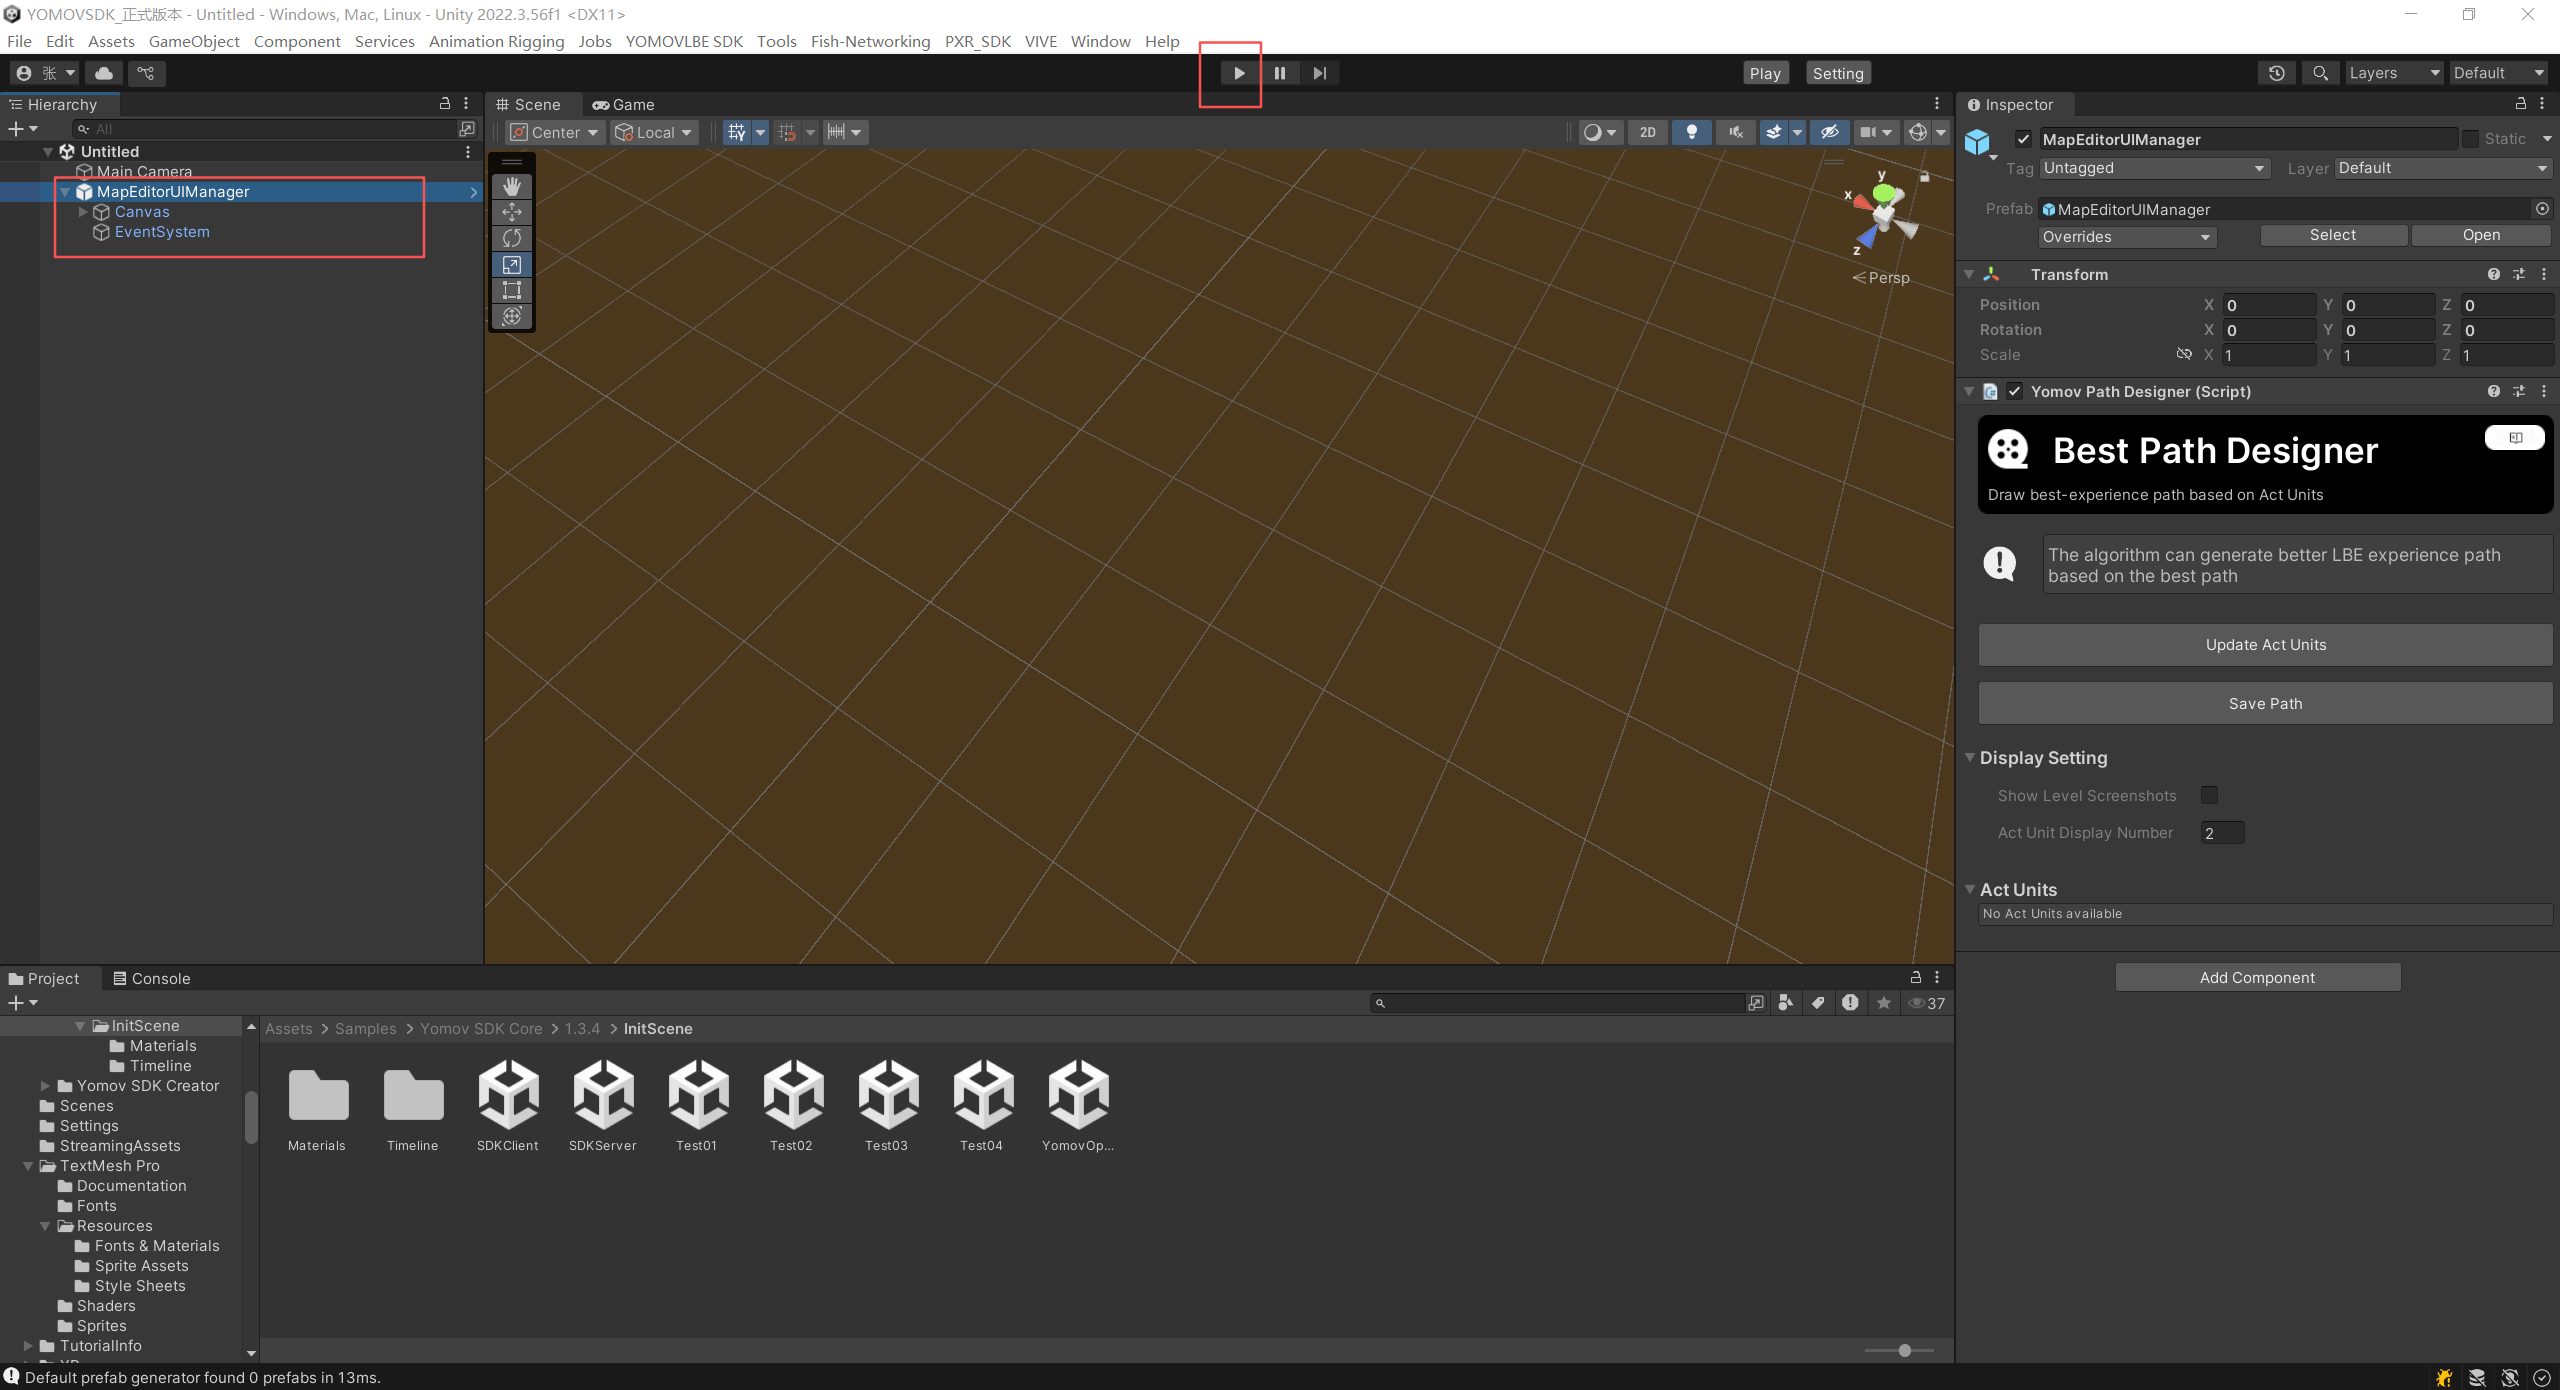
Run the Best-Experience Path editing scene
-
After the scene starts, use the Best Path Designer component to configure the predefined path.
-
The editing window displays default venue dimensions for scale reference only.
-
Select a path unit's Exit Area. The selected boundary is outlined in blue.
-
Drag the Exit Area with the left mouse button to move the unit.
-
Hold Shift and drag the Exit Area with the left mouse button to rotate the unit.
-
Connect each unit's Exit Area to the next unit's Entrance Area to form the complete path.
-
Under Best Path Designer > Display Setting > Act Unit Display Number, set the maximum number of path units shown in the editor.
-
Under Best Path Designer > Act Units, choose which Act units are displayed in the panel.
-
-
In Best Path Designer, click Save Path to export a path file that the YOMOV SDK can load and parse.
-
Development testing: Create a test path based on the dimensions of the current test venue.
-
Content release: Export the route with the best continuity and player experience so the distribution platform can calculate an adapted venue path.
-
Scan the Free-Roam Venue Map
-
Use a supported device, such as PICO 4 Ultra Enterprise, to scan the test venue and define the spatial reference point.
-
Place the reference point near the geometric center of the venue. During full-scale simulation, the system aligns the orientation vector in the Best-Experience Path, shown as a white arrow, with the orientation vector from the venue scan so the experience is positioned correctly.
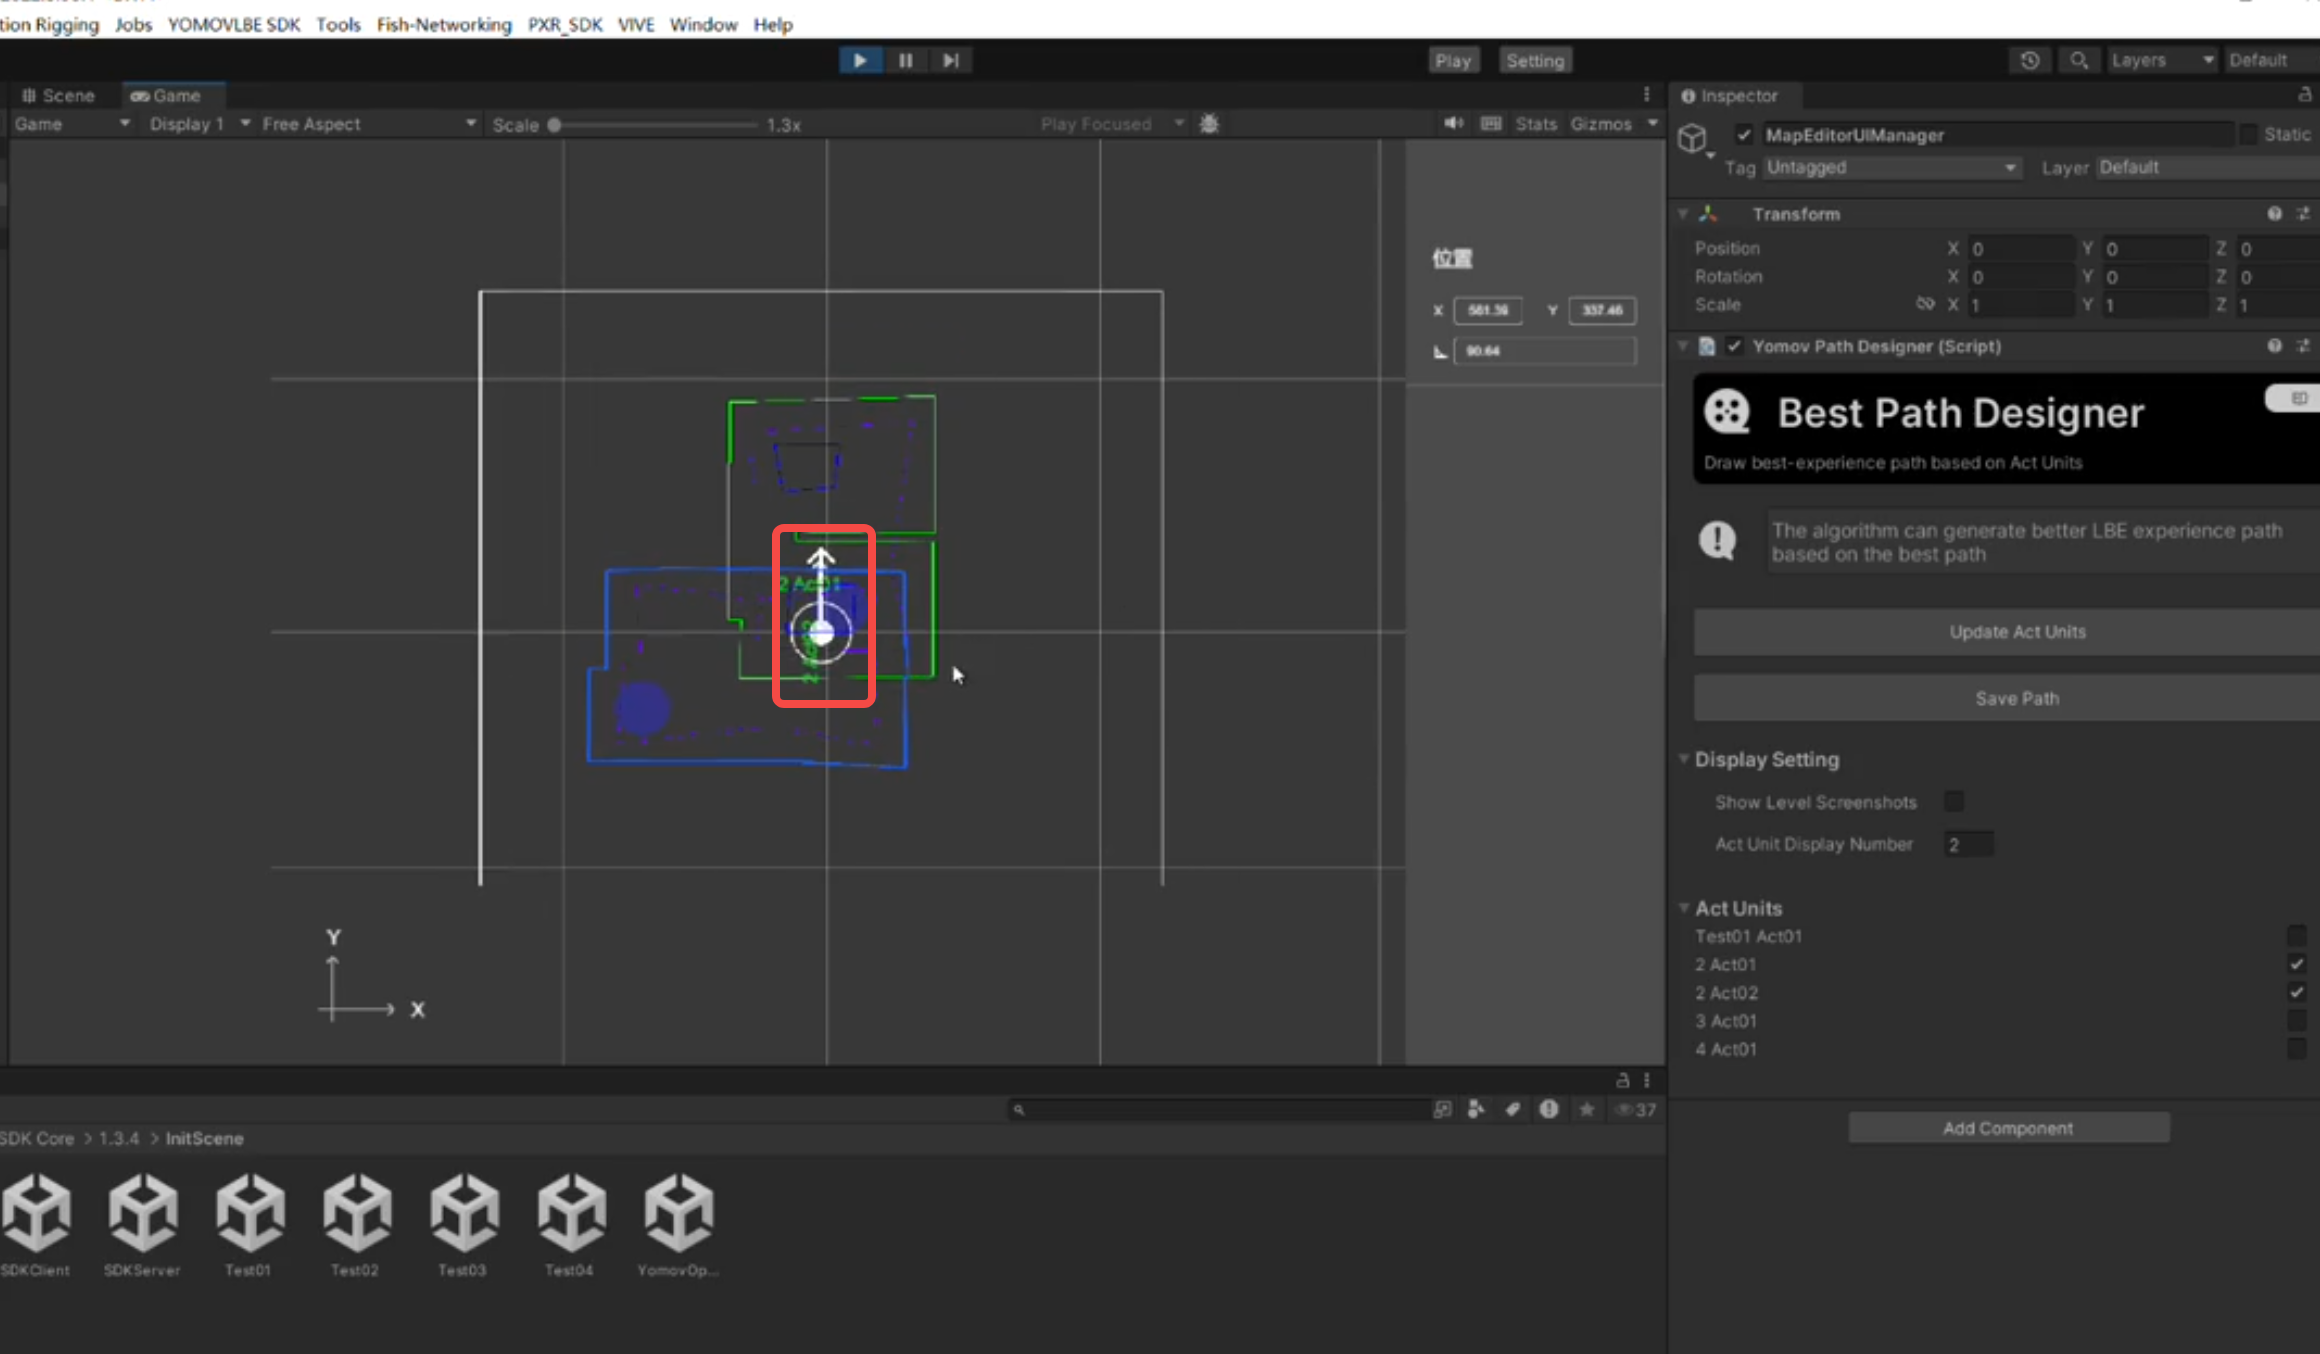
-
Simulator Integration Testing
Use the Playback Control Simulator to test the content startup flow and connection to the Bridge Server for cross-content data synchronization.
For detailed instructions, see YOMOV Playback Control Simulator Guide.
4. Packaging and Delivery
Export Configuration Files
-
Review the Best-Experience Path.
- Optionally use the Best-Experience Path workflow to define the route you want players to experience.
-
After verifying the path boundaries and configuration, go to YOMOV SDK > Setting > LBEPath > Act Units Panel. Click Export Act Units to export the Act path-unit configuration.
- Before exporting, click Update Act Units, then confirm that the path list contains the latest data.
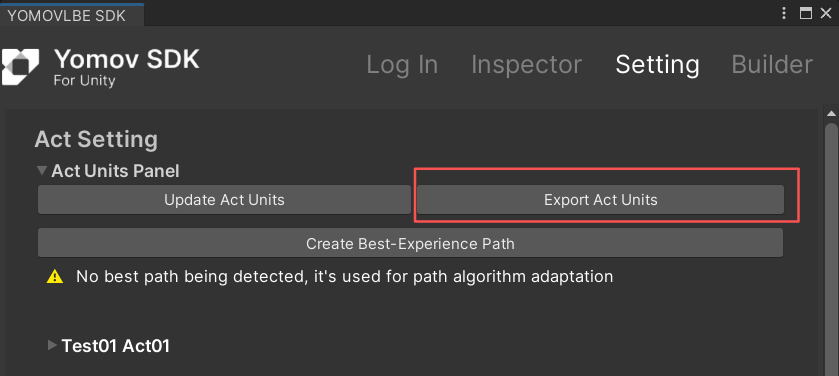
Export the Act path-unit configuration
- Deliver the configuration file to the YOMOV content-platform integration team for upload to the distribution operations platform. During release, the venue map is adapted automatically by the path algorithm.
Application Packaging Workflow
-
Add the required scenes to Build Settings, then configure the Act and Plot component order in each scene.
- Make sure the initialization scene is included in Build Settings. Playback will fail without it because initialization reads the OpenXR configuration.
-
Go to YOMOV SDK > Setting > LBEPath, then click Update Act Sequence to refresh the path playback order.
-
Go to YOMOV SDK > Builder, and select Release under Packaging Type.
-
Click Build to open Build Settings, select the Android platform, and build the application. When prompted, confirm that the Act Sequence is up to date and that the required YOMOVInitial component is present.
-
Versioning Requirements
-
Version format:
-
Use X.Y.Z for both client and server versions: major.minor.patch.
-
Major: Increment for a major feature update or architectural change, for example 1.0.0 to 2.0.0.
-
Minor: Increment when adding a feature or improving existing functionality, for example 1.0.0 to 1.1.0.
-
Patch: Increment for bug fixes or other small changes, for example 1.0.0 to 1.0.1.
-
-
Version comparison:
-
Compare the major number first. A greater major number is newer.
-
If the major numbers are equal, compare the minor number. A greater minor number is newer.
-
If the major and minor numbers are equal, compare the patch number. A greater patch number is newer.
-
Example: 1.2.0 < 1.2.1 < 1.2.2
-
-
Application Package Format
Use the package structures below so the YOMOV content platform can validate and upload the application, and the venue Playback Control System can download and process it correctly.
Application and version management is not currently available to external developers in the YOMOV content distribution platform. After building the application, deliver the package to YOMOV through an approved shared-drive channel.
- Client Package
Platform validation rules:
-
Upload the client as a ZIP archive. Direct APK uploads are not supported.
-
The ZIP archive must contain an APK file.
-
The ZIP archive must contain exactly one APK file. Validation fails if it contains more than one.
-
The platform automatically reads the application name and version from the APK.
-
An archive without an APK is rejected as invalid.
Recommended directory structure:
client-package-v1.0.0.zip
└── app-release.apk
Examples:
-
Valid: app-release.apk
-
Invalid: More than one APK in the archive
-
Invalid: No APK in the archive
- Server Package
Platform validation rules:
-
Include the version number in the directory name.
-
The version directory name must contain at least two periods, for example 1.0.0 or 2.3.15.
-
The archive must contain an EXE file.
-
The primary EXE must be inside a direct child directory of the archive root.
-
Include exactly one EXE so the platform can identify the application correctly.
Recommended directory structure:
server-package-v1.0.0.zip └── 1.0.0 └── xxx.exe
Examples:
-
Valid: 1.0.0/xxx.exe
-
Valid: 2.3.15/app.exe
-
Invalid: xxx.exe placed directly in the archive root
-
Invalid: 1.0.0/windows/xxx.exe because the directory is nested too deeply
-
Invalid: 20260330/app.exe because the directory name is not in the required version format
Verify the structure above before uploading the package.
OBB and AssetBundle Packages
YOMOV supports uploading, distributing, loading, and parsing content delivered as an APK with an OBB package or as AssetBundle resources.
Unsupported manual resource-distribution workflows:
Manually copying a resource package to the headset after downloading the APK.
Requiring venue staff to manually start the APK installation after download.
Use the following archive structure:
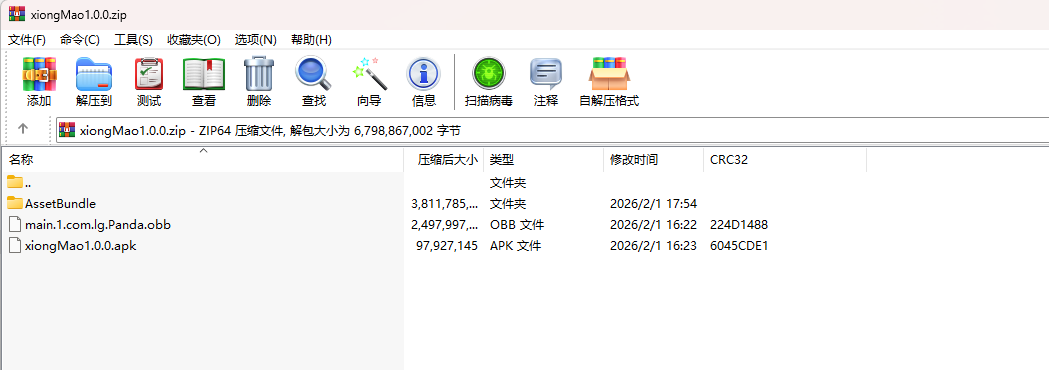
-
Place the OBB or AssetBundle resources at the same directory level as the APK before creating the archive.
-
YOMOV Agent extracts AssetBundle packages into the obb directory.
-
The B in AssetBundle must be uppercase. Otherwise, the resources cannot be moved to the OBB root. Do not place .obb files inside the AssetBundle directory.
-
If the package does not use AssetBundle resources, the AssetBundle directory can be omitted.
-
360-degree video assets require additional processing in the Unity project before they can be loaded from an AssetBundle.
-
Runtime read access is available only from the OBB root directory.